verl框架:1. Ray 集群介绍 + verl 中基于 Ray 的执行流程解析
现代计算机体系结构
现代计算机体系结构如下:
- 多核:一台计算机上有多颗CPU,每个 CPU 有多个计算核心。CPU内部有缓存结构,外部有主存。
- 集群:多台计算机通过高速网络互联,每台计算机上配有至少一块高速网卡。使得不同节点之间互相访问数据就像在单个节点一样。
- 异构计算:CPU 和主存通常被称为主机(Host),各类专用的加速器被称为设备(Device)。当前基于 GPU 的异构计算是主流,GPU 有区别于 CPU 的芯片微架构和编译软件栈。
- 软件层面:GPU 提供了 CUDA编程接口;
- 硬件层面:GPU 有很多个专用计算核心,和 GPU 上的存储。

并行程序设计方法:PCAM
如何设计软件和算法,使得程序可以并行运行在多核或者集群上?PCAM共包括4个步骤:
- 切分:将整个问题切分为多个子问题或子任务,既包括计算部分也包括数据部分;
- 通信:不同子任务之间通信方式,需要包括通信的数据结构、通信算法;
- 聚集:考虑到当前所拥有的硬件性能和编程难度,将上面两步进一步整合,将细粒度的任务整合成更高效的任务;
- 分发:将整合好的任务分发给多个处理器。
举个栗子:有一个超大矩阵,矩阵大小为 M×M,这个矩阵大到无法放在单个计算节点上计算,现在想获取这个矩阵的最大值。设计并行算法时,可以考虑如下思路:
- 将矩阵切分成子矩阵,每个子矩阵 m×m 大小,在每台计算节点上执行
max()函数求得子矩阵的最大值;- 将每个子矩阵的最大值汇集到一个计算节点,在该节点再次执行一下
max()求得整个矩阵的最大值;

案例:MapReduce
Google在2004年提出的MapReduce是一种经典的大数据并行计算范式。其中主要涉及四个阶段:
- 切分(Split):将大数据切分成很多份小数据,每份小数据可以在单个 Worker 上计算。
- 映射(Map):对每个小数据执行 Map 操作,Map 是一个函数映射,程序员需要自定义 Map 函数,Map 函数输出一个键值对(Key-Value)。在词频统计的例子中,每出现一个词,计 1 次,Key 是词,Value 是 1,表示出现 1 次。
- 交换(Shuffle):将相同的 Key 归结到相同的 Worker 上。这一步涉及数据交换。词频统计的例子中,将相同的词发送到同一个 Worker 上。
- 聚合(Reduce):所有相同的 Key 进行聚合操作,程序员需要自定义 Reduce 函数。词频统计的例子中,之前 Shuffle 阶段将已经将相同的 Key 归结到了一起,现在只需要将所有词频求和。

性能指标
FLOPs
FLOPS 指每秒钟能够完成多少次浮点计算。如果进行一个 n 维向量加法:a+b,所需的浮点计算次数为 n。将浮点计算次数除以时间,就是 FLOPS。
加速比
衡量并行相对于串行执行时间的缩短程度:加速比=\(\frac{t_s}{t_p}\),其中 \(t_s\) 为串行程序执行时间,\(t_p\) 为并行程序执行时间。
- 效率:效率=\(\frac{加速比}{N}\)。其中 N 为并行程序所使用的计算核心的数目。
当加速比为 N 时,串行程序可以被线性拓展到多个计算核心上,可以说并行程序获得了线性加速比,即理想情况。现实中,并行程序需要有调度器将不同的任务分发到多个 Worker 上,多个 Worker 之间需要通信,以及数据需要在多个 Worker 之间需要同步,这些步骤都会浪费时间。
Ray
Ray结构
Ray最初为强化学习设计。
当前 Ray 主要由底层的 Ray Core 和上层的各类 Ray AI (Artificial Intelligence) 生态组成:
- Ray Core 是一系列底层 API, 可以将 Python 函数或者 Python 类等计算任务横向扩展到多个计算节点上;
- 在 Ray Core 之上,Ray 封装了一些面向数据科学和人工智能的库(Ray AI Libraries),可以进行数据的处理(Ray Data)、模型训练(Ray Train)、模型的超参数调优(Ray Tune),模型推理服务(Ray Serve),强化学习(RLib)等。
Ray Core API
Ray Core的核心API如下:
- Task:面向函数的接口,该函数可在集群中分布式执行;
- Actor:面向类的接口,该类可在集群中分布式执行;
- Object:分布式对象(不可变),用于在Task和Actor之间传递数据。

分布式函数(Remote Function):@ray.remote 装饰器
通过Ray API定义的Task即远程函数,可以运行在远程的Ray集群上。远程函数是无状态的:只依赖于函数的输入和输出,不依赖函数作用域之外的中间变量。那么如何将 Python 函数横向扩展到 Ray 集群上?
启动Ray集群:可使用ray.init()函数,启动一个单节点的Ray集群,运行在执行这个 Python 任务的计算机上。例如:
1
2
3
if ray.is_initialized:
ray.shutdown()
ray.init(logging_level=logging.ERROR)
通过几个栗子演示。假设使用原生的Python定义一个fibonacci函数,想让这个 Python 函数被 Ray 分布式执行,只需要在函数上增加一个 @ray.remote 装饰器。
1 | # fibonacci函数 |
作为 Ray 的使用者,无需关心 Task 在 Ray 集群中是如何被分布式执行的,也不需要了解这个 Task 被调度到哪些计算节点。所有这些分布式执行的细节都被 Ray 所隐藏,或者说 Ray 帮我们做了底层的分布式与调度这些工作。
使用 Ray 进行分布式扩展,函数可并行地在多个 CPU 核心上执行:
1 | # 使用 Ray 进行分布式扩展 |
原生Python函数和Ray的区别:
- 调用方式:
- 原生Python函数:使用
func_name()调用;- 使用 Ray 时:函数定义增加
@ray.remote装饰器,调用时使用func_name.remote()的形式。- 返回值:
- 使用 Ray 时:
func_name.remote()返回值是ray.ObjectRef类型的对象,ray.ObjectRef并不是一个具体的值,而是一个 Future(尚未完成但未来会完成的计算),需要使用ray.get()函数获取该调用的实际返回值。- 执行方式:
- 原生Python函数:调用形成阻塞,等待结果返回才进行后续计算(同步执行);
- 使用 Ray 时:异步执行(
func_name.remote非阻塞;ray.get(ObjectRef)阻塞)- 立即返回一个
ray.ObjectRef,调用者不需要等待这个函数的计算真正执行完,函数的计算是在后台某个计算节点上执行的;ray.get(ObjectRef)会等待后台计算结果执行完,将结果返回给调用者。
分布式对象(Remote Object)存储:ray.put() 与 ray.get()
Ray 分布式计算中涉及共享数据可被放在分布式对象存储中,这些数据被称为远程对象。我们可以使用 ray.get() 和 ray.put() 读写这些远程对象。与内存中的 Python 对象实例不同,Remote Object 是不可原地直接更改的。
操作 Remote Object 主要有 ray.put() 和 ray.get() 两个 API:
ray.put():把某个计算节点中的对象数据进行序列化,并将其写入到 Ray 集群的分布式对象存储中,返回一个RefObjectID(RefObjectID是指向这个 Remote Object 的指针)。我们可以通过引用这个RefObjectID,在 Remote Function 或 Remote Class 中分布式地使用这个数据对象。ray.get():使用RefObjectID把数据从分布式对象存储中拉取回来,并进行反序列化。

举个栗子:
1 | def create_rand_tensor(size: Tuple[int, int, int]) -> torch.tensor: |
修改数据
Remote Ojbect 中的数据是不可修改的(Immutable),即无法对变量原地更改。在单机上,我们可以对变量进行赋值;但在 Ray 中,我们无法原地更改 Remote Object 的值。
如果想使用新数据,应该使用 Remote Function 或者 Remote Class 对 Remote Object 进行转换操作,生成新的 Remote Object。
1 |
|
传递参数:通过RefObjectID
直接传递:在 Task 或者 Actor 的函数调用时,将
RefObjectID作为参数传递进去。1
2
3
4
5
6
7
8
9
10
def echo(x):
print(f"current value of argument x: {x}")
return x
x = list(range(5))
# `x_obj_ref` 是一个 `RefObjectID`
x_obj_ref = ray.put(x)
# 直接将RefObjectID作为参数传递,echo()这个 Remote Function 将自动从 `x_obj_ref` 获取 `x` 的值,该过程称为:自动反引用
ray.get(echo.remote(x_obj_ref))
输出:(echo pid=22623) current value of argument x: [0, 1, 2, 3, 4]
复杂数据结构:如果
RefObjectID被包裹在一个复杂的数据结构中,Ray 并不会自动获取RefObjectID对应的值,即反引用并不是自动的。1
2ray.get(echo.remote({"obj": x_obj_ref})) # 包裹在一个 dict 中
ray.get(echo.remote([x_obj_ref])) # 包裹在一个 list 中输出:
1
2(echo pid=70963) current value of argument x: {'obj': ObjectRef(00ffffffffffffffffffffffffffffffffffffff0100000010000000)}
(echo pid=70963) current value of argument x: [ObjectRef(00ffffffffffffffffffffffffffffffffffffff0100000010000000)]
底层实现
Ray 集群的每个计算节点,都有一个基于共享内存的对象存储。
当某个 Remote Object 的数据量较小时(<= 100 KB),它会被存储在计算节点进程内存中;当数据量较大时,它会被存储在分布式的共享内存中;当集群的共享内存的空间不够时,数据会被外溢(Spill)到持久化的存储上,比如硬盘或者S3。
分布式类(Actor)
举个栗子:
Ray 的 Remote Class 也使用
ray.remote()来装饰;1
2
3
4
5
6
7
8
9
10
11
class Counter:
def __init__(self):
self.value = 0
def increment(self):
self.value += 1
return self.value
def get_counter(self):
return self.value初始化一个实例:在类名
Counter后面加上remote(),即创建一个分布式的 Actor;1
counter = Counter.remote()
调用实例的函数:加上
remote(),即对象实例.函数名.remote();1
2obj_ref = counter.increment.remote()
print(ray.get(obj_ref))
可以用同一个类创建不同的 Actor 实例:不同 Actor 实例的成员函数调用可以并行化执行;同一个 Actor 的成员函数调用顺序执行。
1 | # 创建 10 个 Actor 实例 |
Actor编程模型:分布式编程的范式,基本要素是 Actor 实例,即每个 Actor 对象都是唯一的。可以把单个 Actor 实例理解成单个带地址信息的进程。
- Actor 存储的状态数据只能由 Actor 自己来管理,不能被其他 Actor 修改;
- 消息驱动:给某个 Actor 发送消息,它就会对该消息进行响应,修改自身的状态或者继续给其他 Actor 发送消息。
- 对同一个 Actor 多次发送同样请求,多次请求是顺序执行的。
栗子:Actor Pool
实践上,经常创建一个 Actor 资源池(Actor Pool),ActorPool 有点像 multiprocessing.Pool,包含多个 Actor,每个 Actor 功能一样,而且可以分布式地在多个计算节点上运行。
1 | from ray.util import ActorPool |
如果我们想调用 ActorPool 中的 Actor,可以使用 map(fn, values) 和 submit(fn, value) 方法。
map():values是一个列表,让函数并行地分发给多个 Actor 处理;submit():value是单个值,每次从ActorPool中选择一个 Actor 执行。submit()的value参数只能是单个对象,不能是参数列表,如果想传入多个参数,可以把参数包裹成元组。
fn 是一个 Lambda 表达式,或者说是一个匿名函数。这个 Lambda 表达式有两个参数:actor 和 value,actor 是ActorPool 中的 Actor,第二个参数是函数的参数。
1 | pool.map(lambda a, v: a.double.remote(v), [3, 4, 5, 4]) |
map() 和 submit() 将计算任务提交到了 ActorPool 中,ActorPool 并不是直接返回结果,而是异步地分发给后台不同的 Actor 去执行。需要使用 get_next() 阻塞地返回结果。
1 | try: |
结果为:
1 | 6 |
Ray集群
Ray 集群由一系列计算节点组成,包括两类关键的节点:头节点(Head)和工作节点(Worker)。这些节点可以部署在虚拟机、容器或者是裸金属服务器上。
头节点额外包括:GCS,即Ray 集群的全局元数据管理服务;负责存储和管理诸如哪个 Actor 被分配到哪个计算节点等元数据信息。这些元数据被所有 Worker 共享。
每个节点包括一个Driver:执行程序的入口点,指的是Python 的 __main__ 函数。通常,__main__ 在运行时不应该执行大规模计算,而是负责将 Task 和 Actor 调度到具备足够资源的 Worker 上。

在 Ray 分布式计算环境中,所有节点上都运行着一些关键进程。
Raylet:每个计算节点上运行着一个 Raylet, Raylet 被多个 Worker 进程所共享。Raylet 主要包含两个组件:一个是调度器,它负责资源管理和任务分配;另一个是基于共享内存的对象存储,它负责本地数据存储,各个计算节点上的对象存储共同构成了 Ray 集群的分布式对象存储。
Worker:每个计算节点上运行着一个或多个 Worker 进程,这些进程负责执行计算任务。Worker 进程可以是无状态的,意味着它们可以反复执行 Task 对应的任务;它们也可以是有状态的 Actor,即执行远程类的方法。默认情况下,Worker 的数量等于其所在计算节点的 CPU 核心数。
启动Ray集群:如果Python 代码中使用 ray.init() 方式,仅在本地启动了一个单机的 Ray 集群。实际上,Ray 集群包括头节点和工作节点,应该分别启动。先在头节点启动:
1 | ray start --head --port=6379 |
启动工作节点:
1 | ray start --address=<head-node-address>:<port> |
通过ray up example.yaml启动:接收 yaml 文件作为参数,在 yaml 文件里定义好头节点地址、工作节点地址。
1 | cluster_name: default |
Ray 的头节点暴露三个端口号,默认分别是 6379, 8265, 10001。
- 启动 Ray 时,设置了 Ray 头节点的端口号,默认为 6379,是头节点和工作节点之间通信的端口;
- Ray 头节点启动后,提供了一个 Ray 仪表盘端口号,默认为 8265,可用来接收 Ray 命令行提交的作业;
- 此外,还有一个端口 10001,默认为
ray.init()连接时使用。
计算资源与资源组
Ray 可以管理计算资源,包括 CPU、内存和 GPU 等各类加速器。这里的计算资源是逻辑上的,逻辑资源与物理上的计算资源相对应。Ray 集群的各个节点启动时会探测物理计算资源,并根据一定规则映射为逻辑上的计算资源。默认规则如下:
CPU:每个节点中的物理 CPU 个数(
num_cpus)GPU:每个节点中的物理 GPU 个数(
num_gpus)内存:每个节点可用内存的 70%(
memory)可自行指定:
1
ray start --num-cpus=32 --num-gpus=4
Ray集群支持自动缩放,指的是满足 Task 或 Actor 代码中定义的计算资源请求(比如,task.options() 请求的计算资源),而不是根据计算节点的资源实际利用情况自动缩放。主要面向以下场景:
- 当 Ray 集群的资源不够时,创建新的工作节点。
- 当某个工作节点闲置或者无法启动,将该工作节点关闭。
资源需求
默认情况下:
Ray Task使用1个逻辑CPU,既用于任务调度,也用于执行计算任务;
Ray Actor使用1个逻辑CPU进行任务调度,0 个 CPU 运行计算任务。
如果不做设置,可能造成 Ray Actor 不需要计算资源的假象,导致大量 Actor 被调度到同一个计算节点上。可进行指定:
1
2
3
4
5
6
7
8
9
10
def func():
...
class Actor:
pass
# 或者:
func.options(num_cpus=4).remote()
资源组(Placement Group)
允许用户原子地使用集群上多个节点的计算资源:资源要么全部分配给用户,要么完全不分配,不会出现只分配部分资源的情况。主要适用以下场景:
- 组调度:一个作业需要一组资源,这些资源需要协同工作以完成任务。要么分配,要么不分配。如果只分配给这个作业部分资源,将无法完成整个任务。
- 例如在大规模分布式训练中:可能需要多台计算节点和多块GPU,这时可以在Ray集群中申请并分配这些资源。
- 负载均衡:作业需要在多个节点上进行负载均衡,每个节点承担一小部分任务。Placement Group可以确保作业尽量分散到多个计算节点上。
- 例如在分布式推理场景中:如果一个作业需要8块GPU,每个GPU负责加载模型并独立进行推理,为了实现负载均衡,应该将作业调度到8个计算节点上,每个节点使用1块GPU。这样做的好处是,如果一个节点发生故障,不会导致整个推理服务不可用,因为其他节点仍然可以继续工作。
关键概念:
- 资源包(Bundle):一个键值对,定义所需的计算资源,比如
{"CPU": 2},或{"CPU": 8, "GPU": 4}。一个 Bundle 必须可以调度到单个计算节点;比如,一个计算节点只有 8 块 GPU,{"GPU": 10}是不合理的。- 多个 Ray Task 或 Actor 可以运行在同一个 Bundle 上;任何使用同一个 Bundle 的 Task 或 Actor 将一直运行在该计算节点上。
- 资源组(Placement Group):Placement Group 是一组 Bundle。比如,
{"CPU": 8} * 4向 Ray 集群申请 4 个 Bundle,每个 Bundle 预留 8 个 CPU。
举个完整栗子:
1 | from ray.util.placement_group import ( |
placement_group()接收strategy参数:
STRICT_PACK:所有 Bundle 都必须调度到单个计算节点。
PACK(默认策略):所有 Bundle 优先调度到单个计算节点,如果无法满足条件,再调度到其他计算节点,
STRICT_SPREAD:每个 Bundle 必须调度到不同的计算节点。
SPREAD:每个 Bundle 优先调度到不同的计算节点,如果无法满足条件,有些 Bundle 可以共用一个计算节点。
对比:
STRICT_PACK和PACK保证了数据的局部性,计算任务可以快速访问本地的数据;STRICT_SPREAD和SPREAD使得计算更好地负载均衡。


Ray作业
Ray 作业指的是用户编写的,基于 Task、Actor 或者 Ray 各类生态(Ray Train、Ray Tune、Ray Serve、RLlib 等)的具体的计算任务。主要包括三种作业提交方式:
Ray Jobs 命令行:
RAY_ADDRESS根据头节点的地址设定;--working-dir为工作目录,Ray 会将该目录下的内容打包,分发到 Ray 集群各个节点;ENTRYPOINT指的是需要执行的 Python 脚本,本例中,是python script.py.1
RAY_ADDRESS='http://127.0.0.1:8265' ray job submit --working-dir ./ -- python script.py
依赖管理:启动作业时,设置
--runtime-env-json,原理是为每个作业创建一个独立的虚拟环境。Python SDK:将提交作业的各类参数写在 Python 代码中,执行 Python 代码来提交作业。
1
2
3
4
5
6
7
8
9
10
11
12
13
14
15
16
17
18
19
20
21
22
23
24import time
from ray.job_submission import JobSubmissionClient, JobStatus
client = JobSubmissionClient("http://127.0.0.1:8265")
# submit_job()方法的作业提交是异步的:调用此方法后,Ray 会马上返回作业的 ID
job_id = client.submit_job(
entrypoint="python script.py",
runtime_env={"working_dir": "./"}
)
print(job_id)
def wait_until_status(job_id, status_to_wait_for, timeout_seconds=5):
start = time.time()
while time.time() - start <= timeout_seconds:
status = client.get_job_status(job_id)
print(f"status: {status}")
if status in status_to_wait_for:
break
time.sleep(1)
# wait_until_status() 函数不断向 Ray 集群请求,检查作业的当前状态
wait_until_status(job_id, {JobStatus.SUCCEEDED, JobStatus.STOPPED, JobStatus.FAILED})
logs = client.get_job_logs(job_id)
print(logs)Ray客户端:在 Python 中使用
ray.init()函数,直接指定Ray集群的地址:ray.init("ray://<head-node-host>:<port>")。在客户端与Ray集群意外断开连接的情况下,Ray会尝试在30秒后重新建立连接。如果重新连接失败,Ray将销毁所有相关的引用。可以通过设置环境变量
RAY_CLIENT_RECONNECT_GRACE_PERIOD来自定义这个重连尝试的时间间隔。
Ray Data
Ray Data 是一个构建在 Ray Core 之上的数据处理框架,对数据提供了一个抽象类:ray.data.Dataset,它封装了数据并在上面实现了常见的大数据处理原语。包括:
- 数据的读取:比如读取 Parquet 文件等。
- 对数据的转换(Transformation)操作:比如
map_batches()。 - 分组聚合操作:比如
groupby() - 数据在计算节点间的交换:比如
random_shuffle()和repartition()等。
ray.data.Dataset
Dataset 底层的基本单元是 Block;Dataset 实际上是一个分布式的 ObjectRef[Block]。
Block 是一个数据结构,它基于Apache Arrow格式构建,这是一种高效率的列式存储格式,适用于在内存中处理和操作大量数据。
以下展示了一个由 3 个 Block 组成的 Dataset:可以使用 from_*() API 从其他系统或格式导入成 Dataset,比如 from_pandas() 、from_spark()。或者使用 read_*() API 从持久化的文件系统重读取,比如 read_parquet()、read_json() 等。

数据读写
Ray Data 使用 Ray Task 并行地读写数据: 
数据加载:
Parquet Text CSV TFRecord 二进制 方法 read_parquet()read_text()read_csv()read_tfrecords()read_binary_files()行列裁剪:
1
2
3
4
5
6
7
8import pyarrow as pa
dataset = ray.data.read_parquet(
dataset_path,
columns=["passenger_count", "tip_amount", "payment_type"],
filter=pa.dataset.field("tip_amount") > 6.0
)
dataset.show(limit=2)并行度:各类数据读取方法都可以设置
parallelism参数,来控制底层的并行执行的过程。如果不设置parallelism,Ray Data 通过以下方式试探parallelism:- Ray 获取集群中可用的 CPU 核数;
parallelism被设置为 CPU 核数的 2 倍。如果parallelism小于 8,则设置为 8;- 估计每个
Block的大小,如果每个Block平均大于 512 MiB,Ray 增大parallelism,直到每个Block小于 512 MiB。
查看数据:...
数据转换
略
verl Ray
在大致了解 ray 的概念之后,来观察 verl 训练初始化阶段的资源分配。从main.trainer.main_ppo开始,run_ppo函数加载 Hydra 管理的配置项,初始化 Ray 集群并创建分布式进程。
训练主入口: run_ppo()
分为两步:
初始化 Ray 集群:通过
get_ppo_ray_runtime_env()组装默认的runtime_env;从 Hydra 配置读取覆盖项并合并;将合并后的runtime_env回填到ray_init_kwargs,最终调用ray.init(...)完成初始化。1
2
3
4
5
6
7
8
9if not ray.is_initialized():
# Initialize Ray with a local cluster configuration
# `num_cpus` specifies the number of CPU cores Ray can use, obtained from the configuration
default_runtime_env = get_ppo_ray_runtime_env()
ray_init_kwargs = config.ray_kwargs.get("ray_init", {})
runtime_env_kwargs = ray_init_kwargs.get("runtime_env", {})
runtime_env = OmegaConf.merge(default_runtime_env, runtime_env_kwargs)
ray_init_kwargs = OmegaConf.create({**ray_init_kwargs, "runtime_env": runtime_env})
ray.init(**OmegaConf.to_container(ray_init_kwargs))初始化后启动远程
TaskRunner执行训练:1
2
3
4
5
6
7
8
9
10
11
12if (
is_cuda_available
and config.global_profiler.tool == "nsys"
and config.global_profiler.get("steps") is not None
and len(config.global_profiler.get("steps", [])) > 0
):
......
else:
# TaskRunner 是一个 Ray Actor,在 Ray 集群上异步执行训练任务
runner = TaskRunner.remote()
# 通过 ray.get() 阻塞直到远程任务执行完毕
ray.get(runner.run.remote(config))
现在一起来理理:
- 如何设置
runtime_env呢?
方式一(推荐):Hydra 配置中设置
ray_kwargs.ray_init.runtime_env:get_ppo_ray_runtime_env()会提供 PPO 训练必要的env(如TOKENIZERS_PARALLELISM、NCCL_DEBUG等),并自动忽略系统里已设置的同名环境变量;Hydra 配置与默认值字段合并。
2
3
4
5
6
7
8
9
ray_init:
address: "auto" # 可选
num_cpus: 64 # 可选
runtime_env:
working_dir: ./ # 可选
env_vars:
TORCH_NCCL_AVOID_RECORD_STREAMS: "1"
CUDA_DEVICE_MAX_CONNECTIONS: "1"方式二:Ray Job 提交(ray job submit)加载 YAML:本地不会直接读
verl/trainer/runtime_env.yaml;需要通过ray job submit --runtime-env=...由 Ray 提交端读取并注入。在集群侧,run_ppo 仍会把默认值与 Hydra 的 runtime_env 合并
2
3
4
5
6
working_dir: ./
excludes: ["/.git/"]
env_vars:
TORCH_NCCL_AVOID_RECORD_STREAMS: "1"
CUDA_DEVICE_MAX_CONNECTIONS: "1"启动脚本示例:
2
3
4
5
6
7
8
9
export RUNTIME_ENV="$WORKING_DIR/verl/trainer/runtime_env.yaml"
ray job submit --address="http://127.0.0.1:8265" \
--working-dir "$WORKING_DIR" \
--runtime-env="$RUNTIME_ENV" \
-- python3 -m verl.trainer.main_ppo \
--config-path ./verl/trainer/config --config-name ppo_trainer \
ray_kwargs.ray_init.address=auto方式三:通过
RAY_JOB_CONFIG_JSON_ENV_VAR注入:在提交端设置RAY_JOB_CONFIG_JSON_ENV_VAR,把runtime_env作为 JSON 注入;例子:
2
3
4
5
6
export RAY_JOB_CONFIG_JSON_ENV_VAR="$RAY_JOB_CONFIG_JSON"
python -m verl.trainer.main_ppo \
--config-path ./verl/trainer/config \
--config-name ppo_trainer
ray.init(...)传入的参数包含哪些项呢?
2
3
4
runtime_env={"env_vars": {...}},
num_cpus=config.ray_init.num_cpus,
)
重点在于 TaskRunner,作为实现 PPO/GRPO 训练的核心组件,将整个 RL 训练流程封装在一个独立的 Ray Actor 中,以执行跨节点和 GPU 的分布式执行。
TaskRunner.run()
TaskRunner.run是分布式 PPO 训练的核心执行方法,运行在远程 Ray Actor 中。该方法负责注册分布式 Worker、下载模型 checkpoint、初始化 tokenizer/processor/reward_manager、初始化资源池、创建数据集(train_dataset/val_dataset)和采样器,最后启动 PPO 训练器 RayPPOTrainer。
1 | # TaskRunner.run() 中的调用链 |
注册:根据策略引入对应的ActorRolloutRefWorker和RayWorkerGroup
分布式 Worker 注册流程如下:
1 | actor_rollout_cls, ray_worker_group_cls = self.add_actor_rollout_worker(config) |
以self.add_actor_rollout_worker(...)为例:根据配置项选择FSDP/FSDP2 或 Megatron 策略,引入对应的 ActorRolloutRefWorker / AsyncActorRolloutRefWorker 类以及 RayWorkerGroup / NVMegatronRayWorkerGroup.
1 | def add_actor_rollout_worker(self, config): |
注册结果:
self.role_worker_mapping:角色到 Ray Remote Worker 的映射1
2
3
4
5
6{
Role.ActorRollout: ray.remote(ActorRolloutRefWorker),
Role.Critic: ray.remote(CriticWorker),
Role.RewardModel: ray.remote(RewardModelWorker), # 如果启用
Role.RefPolicy: ray.remote(ActorRolloutRefWorker), # 如果需要
}self.mapping:角色到资源池 ID 的映射(用于 GPU 分配)1
2
3
4
5
6{
Role.ActorRollout: "global_pool",
Role.Critic: "global_pool",
Role.RewardModel: "reward_pool" or "global_pool",
Role.RefPolicy: "global_pool",
}
此时只是注册了角色映射,并没有创建 Worker 实例和分配资源,那么这个过程是在哪里完成的呢?观察RayPPOTrainer.init_workers(),在trainer.ppo.ray_trainer中实现。
实例化:RayPPOTrainer.init_workers()
创建资源池:
1
2
3
4
5def init_workers(self):
# 1. 根据之前定义的 resource_pool_spec 创建实际的 Ray 资源池
self.resource_pool_manager.create_resource_pool()
# 初始化资源池到类的映射字典
self.resource_pool_to_cls = {pool: {} for pool in self.resource_pool_manager.resource_pool_dict.values()}得到的
resource_pool_to_cls是一个嵌套字典:dict[RayResourcePool, dict[str, RayClassWithInitArgs]]。外层键是RayResourcePool对象,管理一组 GPU 资源;内层字典中的键是 Role 的字符串表示(如"ActorRolloutRef", "Critic"),值是RayClassWithInitArgs对象,包含:cls(要创建的 worker 类),args,kwargs(初始化参数)。resource_pool_to_cls的一个例子:1
2
3
4
5
6
7
8
9resource_pool_to_cls = {
<RayResourcePool name="pool1"> {
"ActorRolloutRef": <RayClassWithInitArgs cls=ActorRolloutRefWorker, ...>,
"Critic": <RayClassWithInitArgs cls=CriticWorker, ...>,
},
<RayResourcePool name="pool2"> {
"RewardModel": <RayClassWithInitArgs cls=RewardModelWorker, ...>,
},
}为每个角色创建 Worker 类:每个角色根据其资源池分配创建
RayClassWithInitArgs对象(返回配置好的 Ray Actor)RayClassWithInitArgs保存通过@ray.remote定义的 Actor 类,以及一些用于异步调用该Actor时所需要的参数。一个例子:
class_with_args=RayClassWithInitArgs(cls=GPUWorker)并不会立即初始化 Ray Actor 即GPUWorker;其初始化发生在RayClassWithInitArgs实例发生调用行为时:根据调用时传入的参数,将
GPUWorker(Ray Actor)绑定到特定的 CPU 和 GPU 资源上。例如:
1
2class_with_args(placement_group=pgs[0], placement_group_bundle_idx=0)
# 这里给 GPUWorker 分配在第1个 node 的第一个 bundle 的资源1
2
3
4
5
6
7
8
9
10
11class RayClassWithInitArgs(ClassWithInitArgs):
def __call__(self, placement_group, placement_group_bundle_idx, use_gpu=True, num_gpus=1, sharing_with=None, device_name="cuda"):
# 创建 Ray Actor 的配置选项
options = {
"scheduling_strategy": PlacementGroupSchedulingStrategy(
placement_group=placement_group,
placement_group_bundle_index=placement_group_bundle_idx
)
}
# 返回配置好的 Ray Actor
return self.cls.options(**options).remote(*self.args, **self.kwargs)1
2
3
4
5
6
7
8
9
10
11
12
13
14
15
16
17
18
19
20
21
22
23
24
25
26
27
28
29def init_workers(self):
......
# 2. 为每个角色创建 Worker 类
# 创建 ActorRollout Worker
if self.hybrid_engine:
resource_pool = self.resource_pool_manager.get_resource_pool(Role.ActorRollout)
actor_rollout_cls = RayClassWithInitArgs(
cls=self.role_worker_mapping[Role.ActorRollout],
config=self.config.actor_rollout_ref,
role="actor_rollout",
)
self.resource_pool_to_cls[resource_pool]["actor_rollout"] = actor_rollout_cls
else:
...
# 创建 Critic Worker
if self.use_critic:
......
self.resource_pool_to_cls[resource_pool]["critic"] = critic_cls
# 创建 Reference Policy Worker
if self.use_reference_policy:
......
self.resource_pool_to_cls[resource_pool]["ref"] = ref_policy_cls
# 创建 Reward Model Worker
if self.use_rm:
......
self.resource_pool_to_cls[resource_pool]["rm"] = rm_cls根据资源池初始化
WorkerGroup(RayWorkerGroup实现,绑定到 Ray Actor 实例):如果希望每个 Role 使用不同的资源池以支持不同的并行规模,使用
create_colocated_worker_cls:多个 Worker 共享同一个 Ray Actor 进程1
2
3
4
5
6
7
8
9
10
11
12
13
14
15
16
17
18
19
20
21def create_colocated_worker_cls(class_dict: dict[str, RayClassWithInitArgs]):
"""创建并置的 Worker 类"""
# 确定基础 Worker 类
worker_cls = _determine_fsdp_megatron_base_class([cls.cls.__ray_actor_class__.__mro__ for cls in class_dict.values()])
# 创建包含所有 Worker 的类
class WorkerDict(worker_cls):
def __init__(self):
super().__init__()
self.worker_dict = {}
for key, user_defined_cls in cls_dict.items():
"""key 为不同 model 的 role name,即:actor_rollout, critic, ref, rm 等"""
# 实例化每个 Worker
self.worker_dict[key] = user_defined_cls(*args, **kwargs)
# 绑定方法到父类:monkey-patch,将各个子 Worker 的方法绑定到 WorkerGroup 上(即将 actor_rollout, critic, ref, rm model 的 Worker 定义中被 @register 装饰的函数绑定到 WorkerDict 类)
for key, user_defined_cls in cls_dict.items():
_bind_workers_method_to_parent(WorkerDict, key, user_defined_cls)
return RayClassWithInitArgs(cls=remote_cls)1
2
3
4
5
6
7
8
9
10
11
12
13
14
15
16
17
18
19
20
21
22
23
24
25
26
27
28
29
30
31
32
33
34def init_workers(self):
......
for resource_pool, class_dict in self.resource_pool_to_cls.items():
# class_dict 示例:{"ActorRolloutRef": actor_cls, "Critic": critic_cls}
# 将同一个资源池中的多个 worker 类合并成一个 colocated worker:多个 Worker 共享同一个 Ray Actor
worker_dict_cls = create_colocated_worker_cls(class_dict=class_dict)
# 创建 RayWorkerGroup
wg_dict = self.ray_worker_group_cls(
resource_pool=resource_pool,
ray_cls_with_init=worker_dict_cls,
**wg_kwargs,
)
# 生成实际的 worker 实例
spawn_wg = wg_dict.spawn(prefix_set=class_dict.keys())
# spawn_wg 示例:{"ActorRolloutRef": ActorRolloutRefWorkerGroup, "Critic": CriticWorkerGroup}
all_wg.update(spawn_wg) # 更新到 all_wg
if self.use_critic:
self.critic_wg = all_wg["critic"]
self.critic_wg.init_model()
if self.use_reference_policy and not self.ref_in_actor:
self.ref_policy_wg = all_wg["ref"]
self.ref_policy_wg.init_model()
self.rm_wg = None
if self.use_rm:
self.rm_wg = all_wg["rm"]
self.rm_wg.init_model()
# we should create rollout at the end so that vllm can have a better estimation of kv cache memory
self.actor_rollout_wg = all_wg["actor_rollout"]
self.actor_rollout_wg.init_model()self.ray_worker_group_cls是RayWorkerGroup类;self.worker_dict_cls是ActorRolloutRefWorker类。all_wg是一个字典,键是角色名称,值是RayWorkerGroup实例:1
2
3
4
5
6
7
8
9
10
11
12
13
14
15
16
17
18
19
20
21
22
23
24
25
26
27
28
29all_wg = {
"actor_rollout": <RayWorkerGroup object> {
_workers: [<Ray Actor handles>],
_worker_names: ["worker_0", "worker_1", ...],
_master_addr: "192.168.1.100",
_master_port: 29500,
_world_size: 8,
resource_pool: <RayResourcePool>,
# 绑定的方法: actor_rollout_*, rollout_*, ref_*
},
"critic": <RayWorkerGroup object> {
_workers: [<Ray Actor handles>],
_worker_names: ["worker_0", "worker_1", ...],
_master_addr: "192.168.1.100",
_master_port: 29501,
_world_size: 8,
resource_pool: <RayResourcePool>,
# 绑定的方法: critic_*
},
"rm": <RayWorkerGroup object> {
_workers: [<Ray Actor handles>],
_worker_names: ["worker_0", "worker_1", ...],
_master_addr: "192.168.1.100",
_master_port: 29502,
_world_size: 4,
resource_pool: <RayResourcePool>, # 可能是独立的资源池
# 绑定的方法: rm_*
}
}
基本执行单元:Worker
Worker是分布式训练中的基本执行单元,代表一个独立的计算进程。作为一个基类,具体实现包括:ActorRolloutRefWorker,CriticWorker,RewardModelWorker1
2
3
4
5
6
7
8
9
10
11
12
13
14
15
16
17
18
19
20
21
22
23
24
25
26
27
28
29
30
31# 简化后代码:原始代码位于 verl/single_controller/base/worker.py
class Worker(WorkerHelper):
def __init__(self, cuda_visible_devices=None) -> None:
import os
self._setup_env_cuda_visible_devices()
world_size = int(os.environ["WORLD_SIZE"])
rank = int(os.environ["RANK"])
self._rank = rank
self._world_size = world_size
master_addr = os.environ["MASTER_ADDR"]
master_port = os.environ["MASTER_PORT"]
local_world_size = int(os.getenv("LOCAL_WORLD_SIZE", "1"))
local_rank = int(os.getenv("LOCAL_RANK", "0"))
store = {
'_world_size': world_size,
'_rank': rank,
'_local_world_size': local_world_size,
'_local_rank': local_rank,
'_master_addr': master_addr,
'_master_port': master_port
}
self._configure_with_store(store=store)
.....
self.fused_worker_dict = {}
self.__dispatch_dp_rank = {}
self.__collect_dp_rank = {}
一个栗子:自定义
GPUAccumulator:继承Worker类,假设有4个GPU,则每个GPU实例化一个GPUAccumlator,其成员变量 value 初始化为 GPU rank,然后对所有value执行加1操作。
2
3
4
5
6
7
8
9
10
11
12
13
14
15
16
class GPUAccumulator(Worker):
def __init__(self) -> None:
super().__init__()
# The initial value of each rank is the same as the rank
self.value = torch.zeros(size=(1,), device="cuda") + self.rank
def add(self, x):
self.value += x
print(f"rank {self.rank}, value: {self.value}")
return self.value.cpu()
class_with_args = RayClassWithInitArgs(GPUAccumulator)
resource_pool = RayResourcePool([4], use_gpu=True)
workergroup = RayWorkerGroup(resource_pool, class_with_args)
print(workergroup.add(x=1)) # 输出:[tensor([1.]), tensor([2.]), tensor([3.]), tensor([4.])]
Worker 的数据分发和收集流程
verl 通过装饰器设计实现了数据分发收集机制的巧妙抽象:通过声明式配置将业务逻辑与分布式逻辑完全分离,开发者只需编写普通的方法调用,装饰器就自动处理所有复杂的分布式逻辑,包括数据分发、并行计算、结果收集和数据合并。
训练的调用链路如下图:  数据流如下:
1 | # 完整的训练数据流 |
序列生成:self.actor_rollout_wg.generate_sequences(...)
 在
在verl/workers/fsdp_workers.py和verl/workers/megatron_workers.py中实现:
1 | class ActorRolloutRefWorker(Worker, DistProfilerExtension): |
- 装饰器触发分发函数:
dispatch_lazy_compute_data_proto("rollout", worker_group, prompts),根据dp_rank_mapping分发数据到各个ActorRolloutRefWorker; - 各个
Worker并行执行generate_sequences; - 收集各个
Worker上的结果:collect_nd_compute_dataproto(collect_mask, worker_group, results).
奖励计算
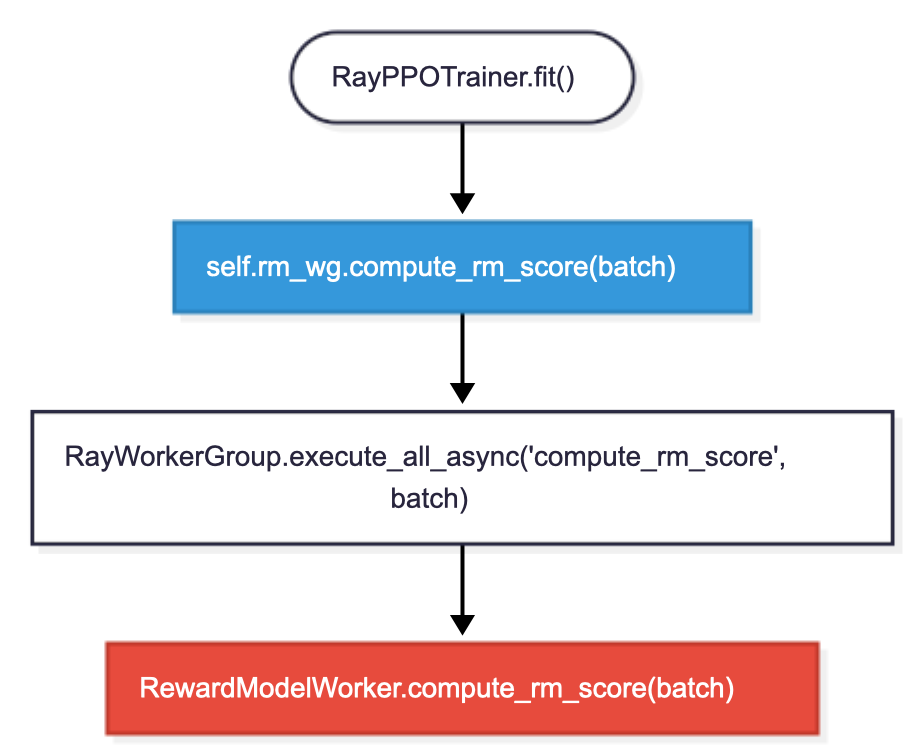
价值函数计算:self.critic_wg.compute_values(batch)
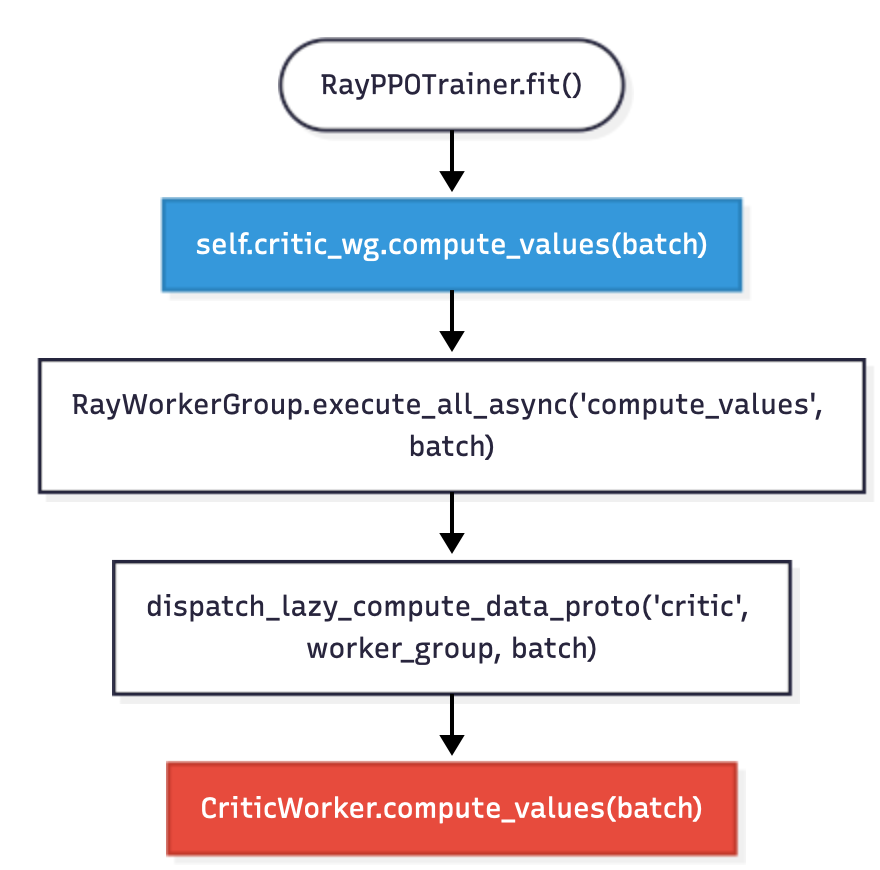
- 装饰器触发分发函数:
dispatch_lazy_compute_data_proto("critic", worker_group, data),数据按 dp_rank 分发给各个CriticWorker; - 各个
Worker并行计算价值函数; - 只有
is_collect=True的 Worker 结果被收集.
策略更新:self.actor_rollout_wg.update_actor(batch)
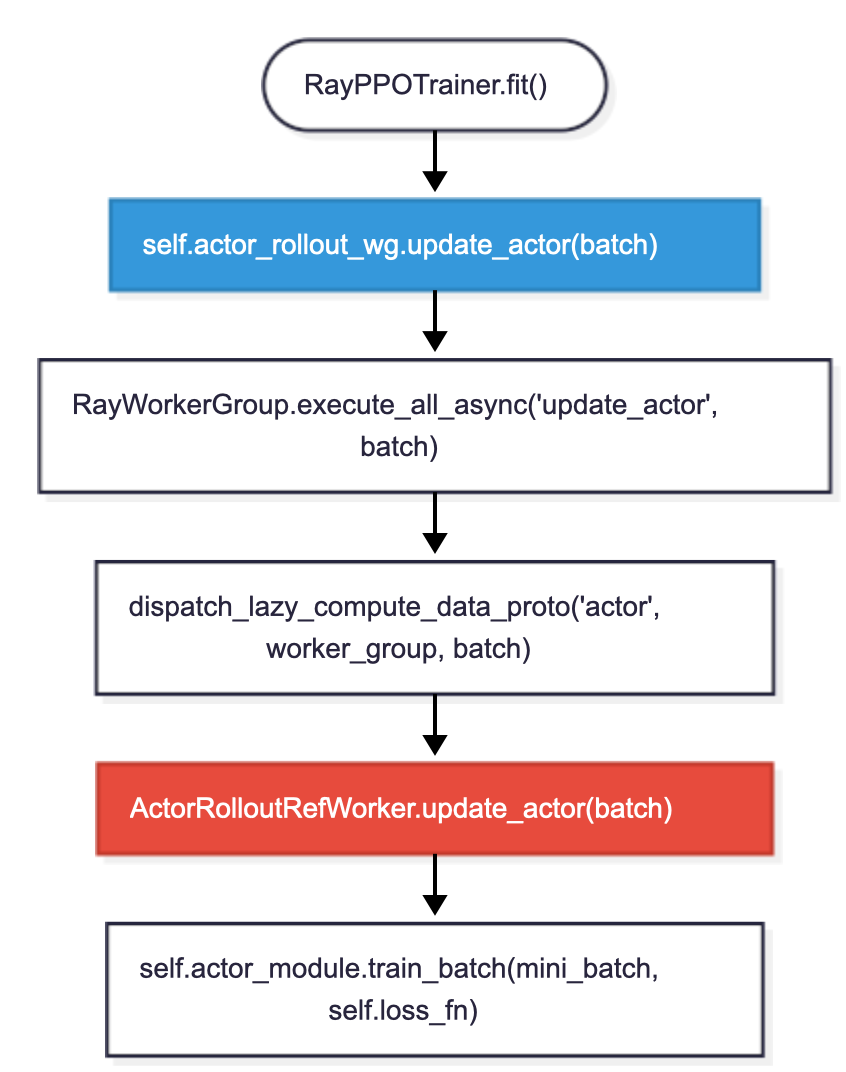
分发阶段实现:
1
2
3
4
5
6
7
8
9
10
11
12
13
14
15
16
17
18
19
20
21
22
23
24
25
26
27
28
29
30
31
32
33
34
35
36def dispatch_lazy_compute_data_proto(mesh_name, worker_group, *args, **kwargs):
# 查询所有 Worker 的分发信息
if mesh_name not in worker_group._dispatch_info:
worker_group._dispatch_info[mesh_name] = worker_group._query_dispatch_info(mesh_name)
dp_rank_mapping = worker_group._dispatch_info[mesh_name]
# dp_rank_mapping 是一个列表,包含每个 Worker 的 dp_rank
# 例如: [0, 1, 2, 3] 表示 4 个 Worker 分别对应 dp_rank 0,1,2,3
dp_size = max(dp_rank_mapping) + 1
# 执行分发
return dispatch_nd_compute_dataproto(dp_rank_mapping, dp_size, worker_group, *args, **kwargs)
def dispatch_nd_compute_dataproto(dp_rank_mapping: list[int], dp_size, worker_group, *args, **kwargs):
"""根据 dp_rank 分发数据"""
# 将数据按 dp_size 分片
splitted_args, splitted_kwargs = _split_args_kwargs_data_proto(dp_size, *args, **kwargs)
return dispatch_nd_compute(dp_rank_mapping, dp_size, worker_group, *splitted_args, **splitted_kwargs)
def dispatch_nd_compute(dp_rank_mapping: list[int], dp_size, worker_group, *args, **kwargs):
"""数据分发的具体实现"""
# 1. 数据分片
splitted_args, splitted_kwargs = _split_args_kwargs_data_proto(dp_size, *args, **kwargs)
# 2. 根据 dp_rank_mapping 分发数据
all_args = []
for arg in args:
transformed_args = []
for i in range(worker_group.world_size):
local_dp_rank = dp_rank_mapping[i] # 获取该 Worker 的 dp_rank
transformed_args.append(arg[local_dp_rank]) # 分配对应的数据分片
all_args.append(transformed_args)
return all_args, all_kwargs分发阶段采用
dp_rank_mapping作为掩码。例子:假设有 4 个 Worker,数据被分成 4 个分片:
分发结果:1
2
3dp_rank_mapping = [0, 1, 2, 3] # 每个 Worker 对应一个 dp_rank
dp_size = 4 # 数据分片数量
data_chunks = [chunk_0, chunk_1, chunk_2, chunk_3] # 4 个数据分片- Worker 0 获得 chunk_0 (
dp_rank=0) - Worker 1 获得 chunk_1 (
dp_rank=1) - Worker 2 获得 chunk_2 (
dp_rank=2) - Worker 3 获得 chunk_3 (
dp_rank=3)
- Worker 0 获得 chunk_0 (
收集阶段:
1
2
3
4
5
6
7
8
9
10
11
12
13
14
15
16
17
18def collect_lazy_compute_data_proto(mesh_name, worker_group, *args, **kwargs):
# 查询所有 Worker 的收集信息
if mesh_name not in worker_group._collect_info:
worker_group._collect_info[mesh_name] = worker_group._query_collect_info(mesh_name)
collect_mask = worker_group._collect_info[mesh_name]
# collect_mask 是一个布尔列表,标记哪些 Worker 参与结果收集
# 例如: [True, False, False, False] 表示只有 Worker 0 参与收集
def collect_nd_compute(collect_mask: list[bool], worker_group, output):
"""根据 collect_mask 选择需要收集的结果"""
output_in_dp = []
for global_rank in range(worker_group.world_size):
collect_dp_rank = collect_mask[global_rank] # 检查该 Worker 是否参与收集
if collect_dp_rank: # 如果该 Worker 负责收集
output_in_dp.append(output[global_rank]) # 添加该 Worker 的结果
return output_in_dp收集阶段采用
collect_mask作为掩码。例子:假设有 4 个
Worker,只有dp_rank=0的Worker负责收集:1
collect_mask = [True, False, False, False]
所有
Worker的输出:1
2
3
4
5
6output = [
worker_0_result, # 会被收集
worker_1_result, # 不会被收集
worker_2_result, # 不会被收集
worker_3_result, # 不会被收集
>]收集结果:只返回
worker_0_result(filtered_output = [worker_0_result])
资源池:RayResourcePool
核心功能:提供一个灵活构造 Ray 的 placement_group 的功能接口。
RayResourcePool 继承自 ResourcePool。
ResourcePool负责存储资源相关的信息:
初始化参数:
- process_on_nodes: 节点进程数列表,表示每个节点上要运行的进程数量
- max_colocate_count: 单个节点上最大并行进程数,默认10
- n_gpus_per_node: 每个节点的GPU数量,默认8
关键属性:
_store: 存储各节点的进程数配置world_size: 属性,计算所有节点的总进程数
1
2
3
4
5
6
7
8
9
10
11
12
13
14
15
16
17
18
19
20
21
22
23
24
25
26
27
28
29class ResourcePool:
def __init__(self, process_on_nodes=None, max_colocate_count: int = 10, n_gpus_per_node=8) -> None:
if process_on_nodes is None:
process_on_nodes = []
self._store = process_on_nodes
self.max_colocate_count = max_colocate_count
self.n_gpus_per_node = n_gpus_per_node # this is left for future huawei GPU that contains 16 GPUs per node
def add_node(self, process_count): # 添加新节点到资源池(动态扩展)
self._store.append(process_count)
def world_size(self):
return sum(self._store)
def __call__(self) -> Any:
return self._store
def store(self):
return self._store
# 获取本地信息
def local_world_size_list(self) -> List[int]: # 生成每个进程对应的本地世界大小列表
nested_local_world_size_list = [[local_world_size for _ in range(local_world_size)] for local_world_size in self._store]
return [item for row in nested_local_world_size_list for item in row]
def local_rank_list(self) -> List[int]: # 生成每个进程的本地 rank 列表
nested_local_rank_list = [[i for i in range(local_world_size)] for local_world_size in self._store]
return [item for row in nested_local_rank_list for item in row]RayResourcePool 通过 Ray 的 Placement Group 实现资源池的分配。
1
2
3
4
5
6
7
8
9
10
11
12
13
14
15
16
17
18
19
20
21
22
23
24
25
26
27class RayResourcePool(ResourcePool):
def __init__(
......
) -> None:
super().__init__(process_on_nodes, max_colocate_count)
......
# 核心方法:构造 placement_group
def get_placement_groups(self, strategy="STRICT_PACK", name=None):
# 默认使用 STRICT_PACK 策略:所有 Bundle 都必须调度到单个计算节点
# (每个 bundle 包含 max_colocate_count 个 CPU 核心)
if self.pgs is not None:
return self.pgs # 缓存已创建的 placement groups
# 生成唯一资源组名称
pg_name_prefix = name if name else f"{self.name_prefix}verl_group_{'_'.join([str(count) for count in self._store])}:"
# 构建资源bundle配置
pg_scheme = [[{"CPU": self.max_colocate_count, "GPU": 1} if self.use_gpu else {"CPU": self.max_colocate_count} for _ in range(process_count)] for process_count in self._store]
lifetime = "detached" if self.detached else None
# 创建placement groups
pgs = [placement_group(bundles=bundles, strategy=strategy, name=pg_name_prefix + str(idx), lifetime=lifetime) for idx, bundles in enumerate(pg_scheme)]
ray.get([pg.ready() for pg in pgs]) # 等待所有资源组就绪
self.pgs = pgs # 缓存结果
return pgs
一个栗子:
创建集群:
2
3
4
>from ray.util.placement_group
># 创建包含 8GPU、16CPU 的 Ray 集群
>ray.init(num_cpus=16, num_gpus=8)假设有2个 node,每个 node 上有4个 GPU。
2
>pgs = resource_pool.get_placement_groups() # 创建 placement group 的列表单个 Placement Group 创建为:
2
3
4
{"CPU": 2, "GPU": 1},
{"CPU": 2, "GPU": 1},
{"CPU": 2, "GPU": 1}])即
process_on_nodes指定要创建几个 Placement Group,以及每个包含多少 GPU;max_colocate_count是指 bundle 中单个 GPU 最多对应多少个 CPU,因为 colocate 的 actor 至少要有1个 CPU。
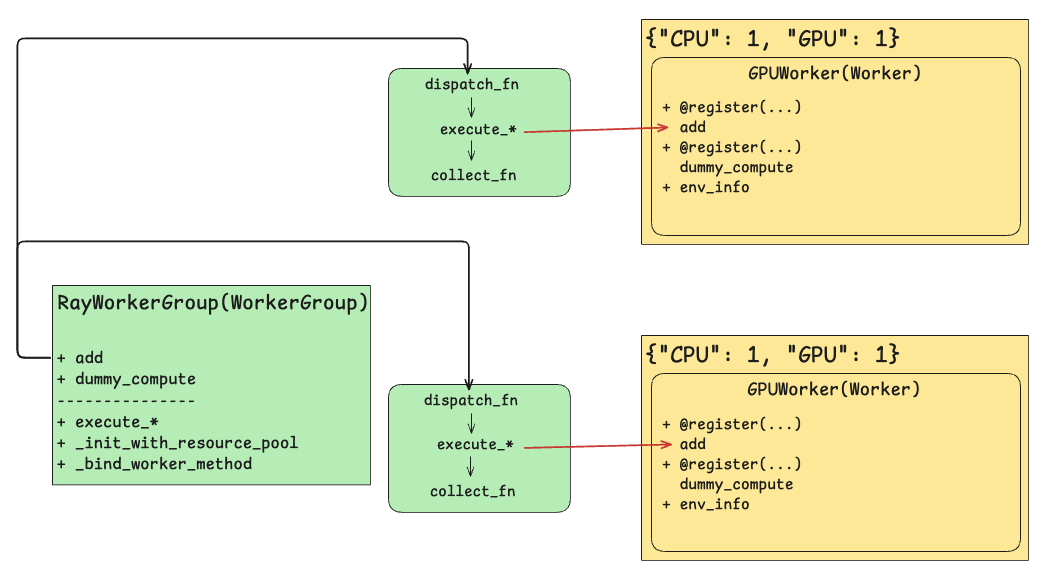
资源调度器:RayWorkerGroup
 总流程包括:
- 初始化
Worker并根据resource_pool分配bundle资源; - 将
Worker中@register装饰的函数注入dispatch_fn,collect_fn,execute_fn,将其同名函数绑定到RayWorkerGroup上。(使得在RayWorkerGroup层可以直接调用Worker中被@register装饰的函数,进而执行不同资源上Worker对应函数。)
RayWorkerGroup(WorkerGroup)对应Single-Controller;GPUWorker(Worker)对应Multi-Controller中的Worker。
初始化函数:__init__
1 | def __init__( |
启动Workers:_init_with_resource_pool
1 | def _init_with_resource_pool(self, resource_pool, ray_cls_with_init, bin_pack, detached): |
异步执行:execute_all_async
在_init_with_resource_pool后,self._workers中保存着所有的worker。
同步执行:
1 | def execute_all_sync(self, method_name: str, *args, **kwargs): |
调用异步执行:RayWorkerGroup.execute_all_async 将数据从 driver 分发到每个
1 | def execute_all_async(self, method_name: str, *args, **kwargs): |
RayWorkerGroup通过属性_workers列表管理所有的 Worker,上述代码中需要显式地遍历_workers列表,且传输给不同 Worker 的数据需要分别处理,比较繁琐。因此利用execute_all_async来调用 worker 的不太方便。
在此基础上,可利用装饰器register和_bind_worker_method使得调用更加自然。
worker 方法绑定至 workergroup:_bind_worker_method
_bind_worker_method来自基类WorkerGroup,参数包含user_defined_cls和func_generator。其中user_defined_cls就是用户自定义的worker类。
函数生成器 func_generator:动态生成一个可执行函数,用于在分布式 Worker 组(WorkerGroup)上执行任务。这个生成的函数会按照指定的 分发(dispatch)、执行(execute)、收集(collect) 逻辑运行,并支持阻塞和非阻塞模式。
1 | def func_generator(self, method_name, dispatch_fn, collect_fn, execute_fn, blocking): |
func_generator类似于装饰器,在method_name对应的函数(即被 @register 装饰的函数)基础上,注入 dispatch_fn, execute_fn, collect_fn 的逻辑:
例如,execute_fn(method_name, *args, **kwargs)实际调用的是RayWorkerGroup中execute_*相关函数,以"execute_mode": Execute.ALL为例,调用execute_all -> execute_all_async,遍历_workers列表中的Worker实例,调用实例函数名method_name对应的函数。
1 | def _bind_worker_method(self, user_defined_cls, func_generator): |
一个栗子:
- 自定义分发函数: 将 2 个输入参数扩展到所有 Worker(
world_size个 Worker)
- 例如,如果
world_size=4,输入x=[1, 2]会被扩展为x=[1, 2, 1, 2],使得每个 Worker 都能接收一个参数。
2
3
4
5
6
7
8
9
10
for arg in args:
assert len(arg) == 2
for i in range(worker_group.world_size - 2):
arg.append(arg[i % 2])
for k, v in kwargs.items():
assert len(v) == 2
for i in range(worker_group.world_size - 2):
v.append(v[i % 2])
return args, kwargs
TestActor(Worker 类):
2
3
4
5
6
7
8
9
10
11
12
13
14
15
16
17
18
19
20
21
22
23
24
25
26
27
28
29
30
31
32
class TestActor(Worker):
def __init__(self, x) -> None:
super().__init__()
self._x = x
def foo(self, y): # 普通方法:直接计算 self._x + y
return self._x + y
'''使用 @register 装饰器,指定分发模式 ALL_TO_ALL 和执行模式 RANK_ZERO:
只会在 rank=0 的 Worker 上执行'''
def foo_rank_zero(self, x, y):
return self._x + y + x
'''使用自定义分发函数 two_to_all_dispatch_fn和收集函数 collect_all_to_all
输入 x 和 y 会被 two_to_all_dispatch_fn 扩展后分发给所有 Worker'''
def foo_custom(self, x, y):
return self._x + y + x
class_with_args = RayClassWithInitArgs(cls=TestActor, x=2)
worker_group = RayWorkerGroup(resource_pool, class_with_args)
output_ref = worker_group.foo_custom(x=[1, 2], y=[5, 6])
'''每个 Worker 计算 self._x + y + x:
Worker 0: 2 + 5 + 1 = 8
Worker 1: 2 + 6 + 2 = 10
Worker 2: 2 + 5 + 1 = 8
Worker 3: 2 + 6 + 2 = 10'''
assert output_ref == [8, 10, 8, 10]
'''只有 rank=0 的 Worker 执行计算:2 + 2 + 1 = 5'''
output_ref = worker_group.foo_rank_zero(x=1, y=2)
assert output_ref == 5
PPO Trainer 训练流程总结
各个 PPO role 的 Worker(ActorRolloutRefWorker, CriticWorker, RewardModelWorker)在初始化时不会马上 build model,而是根据 RayWorkerGroup 分配 resource pool,初始化分布式进程组等。build model(不同 role 根据选择的 backend 初始化模型、配置优化器和学习率调度器、处理模型参数的 CPU/GPU 内存分配等)延迟到调用init_model时。
Worker 涉及 @register 的方法(以 FSDP 为例)如下:
actor_rollout & ref
1
2
3
4
5
6
7
8
9
10
11
12
13
14
15
16
17
18
19
20
21
22
23
24
25
26
27
28
29
30
31
32
33# verl/workers/fsdp_workers.py
class ActorRolloutRefWorker(Worker, DistProfileExtension):
def init_model(self):
......
def update_actor(self, data: DataProto):
......
def generate_sequences(self, prompts: DataProto):
......
def compute_log_prob(self, data: DataProto):
......
def compute_ref_log_prob(self, data: DataProto):
......
def save_checkpoint(self, local_path, hdfs_path=None, global_step=0, max_ckpt_to_keep=None):
......
def load_checkpoint(self, local_path, hdfs_path=None, del_local_after_load=False):
......critic
1
2
3
4
5
6
7
8
9
10
11
12
13
14
15
16
17
18
19
20
21
22class CriticWorker(Worker, DistProfilerExtension):
def init_model(self):
......
def compute_values(self, data: DataProto):
......
def update_critic(self, data: DataProto):
......
def save_checkpoint(self, local_path, hdfs_path=None, global_step=0, max_ckpt_to_keep=None):
......
def load_checkpoint(self, local_path, hdfs_path=None, del_local_after_load=True):
......reward
1
2
3
4
5
6
7
8
9class RewardModelWorker(Worker, DistProfilerExtension):
def init_model(self):
......
def compute_rm_score(self, data: DataProto):
......